Friday, March 28, 2008


This gorgeous Fairy layout by Robyne Sawbridge is sure to impress. Robyne uses tulle, paddle pop sticks and clothing labels to create a one of a kind, think outside the box layout!


Don't forget the best way to get our class handouts is to subscribe. At only $24.95 for 24 handouts you are getting each handout for just over $1 each.
Our class handouts are with the busy scrapbooker in mind! They are available on demand, so you can do them at a time that suits you!
- When you are going to a crop or retreat and don't have time to plan layouts
- When you are stuck for ideas and need a kickstart
- When you love the idea of scrapbooking but don't necessarily want to come up with the ideas
- When you want to learn something new!
- When you don't have access to a local scrapbooking store or the LSS classes are on at a time you cannot attend.
- If you are a teacher and need some ideas for your classes
These classes will help you scrapbook more effectively and efficiently!
Our classes are taught by experienced instructors with a wide variety of styles and specialties.

Saturday, March 08, 2008

Family Hanging Keepsake


This gorgeous hanging keepsake would make a beatiful gift or keep it for yourself. Easily adaptable!


Don't forget the best way to get our class handouts is to subscribe. At only $24.95 for 24 handouts you are getting each handout for just over $1 each.
Our class handouts are with the busy scrapbooker in mind! They are available on demand, so you can do them at a time that suits you!
- When you are going to a crop or retreat and don't have time to plan layouts
- When you are stuck for ideas and need a kickstart
- When you love the idea of scrapbooking but don't necessarily want to come up with the ideas
- When you want to learn something new!
- When you don't have access to a local scrapbooking store or the LSS classes are on at a time you cannot attend.
- If you are a teacher and need some ideas for your classes
These classes will help you scrapbook more effectively and efficiently!
Our classes are taught by experienced instructors with a wide variety of styles and specialties.

Friday, February 22, 2008

Class Handout - The Winery


This weeks class handout has a sophisticated theme that could be used for trips to wineries as was the original layout idea or adapt it to suit wine testing nights or dinner party photos.
The layout is so quick and easy you could use the basic design to suit any colour scheme or photos.


Don't forget the best way to get our class handouts is to subscribe. At only $24.95 for 24 handouts you are getting each handout for just over $1 each.
Our class handouts are with the busy scrapbooker in mind! They are available on demand, so you can do them at a time that suits you!
- When you are going to a crop or retreat and don't have time to plan layouts
- When you are stuck for ideas and need a kickstart
- When you love the idea of scrapbooking but don't necessarily want to come up with the ideas
- When you want to learn something new!
- When you don't have access to a local scrapbooking store or the LSS classes are on at a time you cannot attend.
- If you are a teacher and need some ideas for your classes
These classes will help you scrapbook more effectively and efficiently!
Our classes are taught by experienced instructors with a wide variety of styles and specialties.


Subscribe here

Sunday, February 17, 2008


On Sale this week!

For one week only all 12x12 Albums are on sale for up to 50% off! Grab yourself a bargain, hurry as stocks are limited and once they are gone, they are gone!

Saturday, February 16, 2008

Birthday Card Swap


Birthday Card Swap
Birthday Card Swap -:¦:-..· ´¨¨-:¦:-..· ´¨¨-:¦:-..· ´¨¨-:¦:-..· ´¨¨-:¦:-

Swap time is here again! Please read through all of these details, and if you are seriously interested, please email me PRIVATELY at sonya@memoriesandmore.com.au as well as posting on the forum. We will start with filling up group # 1, but I may add additional groups if necessary.


WHAT YOU WILL DO:
You will make x amount of birthday cards (depending on how many people sign up but a max of 10) These can be all the same or different with any theme or colour. The idea is to get a stash of birthday cards that we can use throughout the year.

WHAT YOU WILL GET BACK:
You will receive back 10 different birthday cards (or however many we end up signing up)

DEADLINE:
AUS residents: your swap items must be postmarked by 18th March 2008
International residents: your package must be postmarked by 11th March 2008

OTHER IMPORTANT INFO:
1) PLEASE NO NOT SIGN UP unless you *know* that you will be able to fulfill your obligation!
2) I will take sign ups on a first come, first served basis. You are not officially in this swap until you hear from me.
3) Sign ups will end 18th Feb.
4) Following the sign ups, final details will be emailed to each participant.


Any questions or to sign up, just email me! sonya@memoriesandmore.com.au Happy Scrappin!

Friday, February 15, 2008

New Class Handout - Gothic Rose


.
Our latest class handout is entitled Gothic Rose! Designed by Terri Brown, this gorgeous layout features K&Company papers and is perfect for either a feminine or heritage style layout.
Our class handouts are with the busy scrapbooker in mind! They are available on demand, so you can do them at a time that suits you!
- When you are going to a crop or retreat and don't have time to plan layouts
- When you are stuck for ideas and need a kickstart
- When you love the idea of scrapbooking but don't necessarily want to come up with the ideas
- When you want to learn something new!
- When you don't have access to a local scrapbooking store or the LSS classes are on at a time you cannot attend.
- If you are a teacher and need some ideas for your classes
These classes will help you scrapbook more effectively and efficiently

Our classes are taught by experienced instructors with a wide variety of styles and specialties.
You can buy the class handouts individually as you see something that you like for the low price of $6.95 or you can subscribe to our 6 month plan and receive 24 class handouts for the low price of $24.95

Order our handouts here

BUY NOW

We also have a FAQ section on our website
FAQ

Wednesday, September 27, 2006


Step 16
Now its time for the finishing touches.
Take the rubbons and cut the strips As show in the image … the two flourish type rubbons go on the top right corner of the photo, on the black cardstock
The smaller stitches Rubons I cut into three pieces and placed them on the bottom left side of the photo. There is another small zig zag stitch rubon in the pack if you don’t have enough the make the distance between the edge of the black and the opera house strip.

Your title goes over the circles in the bottom right corner .. I used Scenic route chipboard alphas but you can use other Chippies, stickers or you could hand cut a title.


And there you have it a Cut it up cherry arte LO

Step 14


Step 14
Now we will place three strips down the left side of the Layout .. place them on the white section on the left , and move them till you have even placement that you are happy with. Then adhere them

Step 15
Place the Paisleys over the three strips of pp down the left side. Here it is important to play with placement before you stick. You need to get he paisleys on the right angle so they fit onto the page perfectly. When youa re happy with the placement adhere them

Step 12 & 13

Step 12
Place three of your circles in the bottom right corner of the Photo, under the frame. And again when your happy with the placement adhere them.

Step 13
Place the final circle under the top left corner of the Photo. And adhere.

Step 11


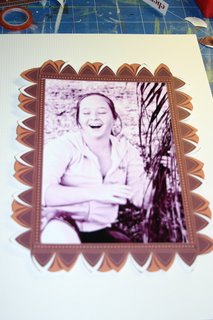
Step 11 place you strips of Opera houses along the edges of the photo and when you have them in a placement you like . trim the ends off. Adhere the pieces to the edge of the photo, but only adhere along the straight edge of the opera house strips.


Note: I photographed this part on a white background for easier veiwing

Step 9 & 10

Step 9
Adhere the black cardstock onto the white cardstock in the top right corner ¾ of an inch from the right side and ¾ inch from the top side .

Step 10
Adhere your photo in the center of that Black cardstock.

Step 8
Time to put this Layout together ..we should have all the pieces we need now.
Step 7
Take a piece of Black cardstock and cut it to 10 inches by 8 inches.

Step 6


Step 6
Take the Green PP and cut out 4 different sized Circles, Doesn’t matter if they are not fully round, you can hide a small edge under the Frame Later.

Step 5


Step 5
Take the Paisley strip with the white dots , and cut around the center of the each of paisleys on the edge of the dots. then cut around the outside edge of each paisley.
I recommend cutting the centers out first, as cutting the centers out of a smaller piece of paper can cause the paper to crumple a bit.

Step 4


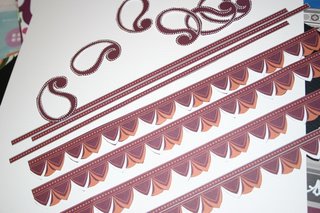
Step four. Now we are going to put the white bordered strips aside and work on the opera house strips. Just simply cut out the triangle pieces to leave the opera houses on the brown bordered dotty strip. Just like in Image 3 Repeat this for all the opera house strips

Step three
Put the Paisley strips to the side. We are going to work on the opera house strips …. You will notice that on one side of the opera houses the dotted border has a white border and the other a brown border … for this step we are going to cut off the white strip. Repeat this on all four opera house strips. You can see this in the image below.

Step two
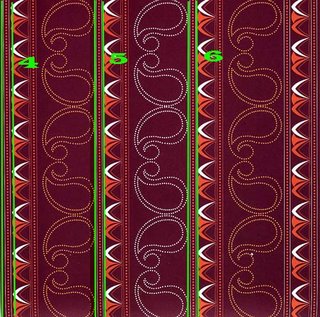
Take the sheet of cherry arte and we are going to cut the four sections highlighted in Image 1 below.. cutting along side the white or brown Lines to leave them in the cut out section. When finished this step, you should have 7 strips of paper. The two brown end bits can be discarded.

Tuesday, September 26, 2006


Ok welcome to my online cut it up class .. There are thousands of patterned papers out there on the market place, and in this class I hope to change the way you look at a sheet of paper.
I use a craft knife and a metal ruler for my straight lines and Just the Craft knife for freehand cutting.


The first step
If you have one available change the blade in your cutting knife.